Friday, December 16, 2011

Empty Olive Oil Bottle Decore Tutorial


Good day friends ,hows life ,pretty busy routine for me as you all must have noticed by now by the little amount of posts i write :) .Today i wanna share a project of mine with you that i completed some 4 Weeks ago but never had the time to compile the pictures together and give it a form of a tutorial and blogger is totally in mood of playing games with me i am writing the whole post for the 2nd time :( although it was getting auto saved but even then every thing just vanished and only the first paragraph was left ARRRGGGGGG I HATE THAT :( ...any how whats done is done so lets take a deep breath let the anger flow out of me ! and i feel better :)...


OK
lets tell you what are we going to need for this project


  • empty olive oil bottle or any other glass bottle
  • German white glue
  • jute cord
  • Round glass balls
  • and last but not least transparent water crystals


first of all thoroughly wash and dry your bottle , then put a generous amount of white glue on the neck of the bottle and on the middle front make two glue circles ,i am doing that on the engraved glass label in order to hide it .


OK now start rolling your jute cord on the neck of the bottle until fully covered and then cut off the access


now make two spirals about 1.5 inch wide and place them on the glue circles

now leave the bottle for 2 hours so that every thing settles down a bit ,


after this time rub some more white German glue on the cord with your fingers ,this step will not only make your just decoration more durable but it will also add a beautiful shine to it when it get completely dry and don't worry about the white appearance of wet glue as it will get transparent when it dries off completely also add the glass balls to the center of the spirals and leave to dry ,it will take about 1 to 2 days to get completely dry so be patient :)

Now comes the fun part that is adding water crystals these are easily available in decoration shops just add the tiny balls to water in a wide container leave over night and they will swell up almost triple their original size by absorbing water ,just fill up your bottle with these transparent crystals .These crystals will need to be soaked in water every fort night but i have experienced that if you put them in a narrow neck container like this olive oil bottle they don't need soaking even for the whole month .


thats it friends i hope you like this project


related projects


Linking to these parties (click here)

Tuesday, November 22, 2011

Kanzashi flower head band


hi friends today i am going to share my latest creation with you ! a bright orange Kanzashi flower fixed on off white double bow


The center of a flower is a simple button with a pearl glued in the center the button is both glued and hand stitched with the flower and bow for extra durability


thats the back part ,since the ribbon wrapped plastic head band is quiet thin and delicate to provide a wide base to settle the flower on ,i used an extra trim of the same ribbon at the base for support .The open edges of the ribbon is heat treated to avoid fraying .
hope you like it :)

Monday, October 31, 2011

Manicure roll in fabric


Hi friends hows life ,today i wanted to share some thing that we have already talked about in quite detail a while ago but today it has a brand new purpose,how many of you (like me) notice a cut in the cuticles (out side your home) but can't do much about it since you don't have the proper equipment to handle the problem ,or a small crack on the side of your nail that can be easily stopped from extending and breaking the whole nail apart but ! again ,don't have a nail cutter ready with you while sitting and waiting in the car , or when you have some free time in some gathering ,when you are not the focus of attention !


keeping all this in mind i designed a small fabric roll for the essential manicure tools that can be folded in a Small cylinder and you can easily store it in your hand bag and take care of your hands and nails when ever you are free, i love the way it turned out, every thing has its own pocket keeping every thing in place


wanna make one your self? :)
click this tutorial of mine ,it takes hardly an hour to finish and make your life easy and your hands will love you for this effort.

Sunday, October 2, 2011

10 minutes flat Sandle's Revamp


Good day friends ,hows life , i am so angry on my self for not being able to be a good and regular blogger ,may be my Gall bladder(removed by surgery)has taken away my punctuality with it :) but the good news is that the creativity inside me is still very much alive so we have HOPE! :)
ok enough beating about the bush lets get back to business a few days back i was enjoying the shopping trip with my elder sis and found some really cool woven flat sandals and they were at a quite reasonable price with lots of potential in them .


So with out secont thought i brought them home and decided to embellish them with simple Kanzashi flowers which i once learned from a Korean friend of mine Miss .Enjang Park .I still miss her at times such a sweet girl :).


I selected this slightly stiff peach color silk fabric and created the two beauties ,its slightly difficult to work with silk in flower making but its worth the shiny look ,for the center i used these fancy peach color buttons which i already had since a long time waiting in my craft box to beautify some thing and yesterday was their big day.


the straps are wide enough so they gave me sufficient area to settle the flowers on them in center with the help of hot glue ,and TADAAAAAA all done some really trendy looking flats are waiting to be worn :) hope you like this simple revamp .

Friday, September 16, 2011

Back to my blog after the surgery :)

Hello dear readers! i know, i know, some of you must be angry on my long absence and some would have forgoten about "arts crafts n Hobbies",but still i am thank full to all of you that you stayed and waited with patience so for the friends like you all deserve some explanation and may be a glimpse to what happened ok lets start i have never mentioned these things on my blog before as its a craft related blog so i always considered the matters related to my SELF as un relevent ,any how guys i had gall stones (stones in my Gall blader) quite some time ago well 4 years to be more exact but they got diagnosed a few months back ,the impared functioning of my gall bladder was causing reapeated ulcers in my stomac also known as (Peptic ulcers)which are very pain full and now when the stones were discoverd in an ultasound i was suggected to surgically remove my gallbladder which was causing my repeated episodes of extreme pain ,so friends here's the news guys i have had my surgery and i am back almost recovered last few days were quite pain full but now things are getting back to normal :) so no more absence from my blog now :) ,this post was just to thank you all to bear the absence with me .

Thursday, August 18, 2011

YOYO Embellished Head band tute


My kids have recently started using head bands instead of pony tails so i made some cute head bands for them i will share them one by one with you all.
Today i will share the maroon and white one which i made to go with a cute dress that my little one has .


the things you will need
  • 1 large YOYO in maroon velvet
  • 1 smaller yoyo in white silk
  • two scrappy strips of white net
  • a vintage button
  • needle and thread
  • transparent glue or glue gun
  • black plastic head band

How to make a yoyo tutorial (in case you dont know how to make one already click on this link)


its pretty simple just stitch the white yoyo on top of the velvet one


add the button in the middle


sew running stitch along one side of the net strips ,pull and secure thread before breaking it off.


stitch the two net fan like shapes at the back of the maroon yoyo and stick this whole thing with the head band thats it friends all done :) hope you like it .a perfect match for the dress ! see how happy she is MahsaAllah:)


linking to
Sunday scoop link to party
Sunday showcase party w/clean mama

Sunday linky party no.29

Monday, August 15, 2011

Flower arrangement on a dry root


Hi friends hows life i am back again to share an other simple arrangement i have made on the dry root ,Yup its the one i was talking about yesterday so hear is a glance of it as i promised .

Its a pretty simple arrangement and hardly took 10 minutes to finish ,i kept it simple as the root it self has a very interesting shape so did not want the flowers to act as a distraction .
All I did was that i hot glued the flowers in place and then added some white beads hear and there to add some further life to the dull root .As i mentioned yesterday i found this root in a dam covered with mud i brought it home scrubbed it clean sun dried it and gave it two coats of varnish to preserve it ,and by the way this root is with me from the last 12 years i found it before my marriage ,and since then i have decorated it in different styles but sadly never took any pictures back then :( {i never knew i will start blogging one day :) } .That's it for today my friends wish you a very happy,healthy and blessed day .

Sunday, August 14, 2011

Fish glob dry arrangement


Good day friends how r u all :).Well as you all know its the month of Ramadan and Iftar Parties are on,and yesterday we had one at my place so while cooking and preparing for the
Iftar i was also decorating our sitting area which have a beautiful triangular fire place .There used to be a fish glob settled there with real gold fish in it once! and they use to look so pretty there adding life to room but sadly they died and after words we bought many more goldfishes but some how none of them survived in the glob so we had to let go of the idea :( but yesterday suddenly this new decorative idea popped into my mind that why dont i arrange a bunch of artificial flowersinside it, so after some trials i was finally happy with the
presented look :) how do you find it ?

all i did is that i bend the stem of the bunch and taped it with the marble surface and inverted the fish glob over it .To insert the bunch inside the globe i softly hold the flowers and leaves close to each other so that they can pass through the tiny opening of the glob without damaging the shape of the bunch.That was the main part and then to add some more interesting look to the arrangement i added some cones and a dried root to it


i found these cones (and these are not pine cones) in NathiaGali a beautiful hilly station near Maree and frankly i still dont know the name of the tree they are from :)


and this snake like root along with another one was found in a dam in my city they were full of mud but i loved the look of it so brought them home washed and painted some wood varnish over them .In my next post i will show you another easy arrangement that i made with the other root .So stay tuned


You may also use some thing else to decorate the surroundings as for example some lacquer sprayed pebbles of different sizes or may be glass pebbles or some corals and sea shells it totally depends on you and the colors scheme of your room ........ have fun :)

linking to

making the world cuter monday

Thursday, August 11, 2011

The Wash Basin Tap Revamp


Hello dear friends how r u all ,today's post is a simple idea to improve the look of old wash basin Tap Valves .No! No.....you dont have to be a plumber for that, neither you need heavy tools like giant sized ranches ,screw drivers etc ,all you need is a some news paper and some spray paint thats it .
Wana know how to do this ?


OK hears the embarrassing "before picture" of our wash basin Tap some how the moisture and dust have entered in between the two layers of the valves giving it a very ugly and dirty look and the interesting thing is that it can not be disassembled or opened so that we can clean it out :( now the only solution left is to change the tap valves but unfortunately its an old design and spare parts are not available for this one so we either had to change the tap it self or just keep it as it is but i was not happy either way so thats what i did.


I tore long strips of news paper dipped them in water and then warped the tap stem and covered the area of wall and basin around the tap .The reason i dipped the news paper in water was that it makes the wrapping really easy and manageable, that not all wet news paper would temporarily stick to what ever surface it comes in contact with so it was really easy to cover the back wall and parts of basin.

Dry the valves with tissue paper and spray paint them with the coordinating color with your sanitary,let dry for half an hour and give it an other coat of spray paint and again leave to dry . Remove the news paper,if some paint accidentally leaked through the news paper ,no worries ! it can be very easily rubbed clean with paint Thinner.

there my new clean tap valves :) hope you liked them too!

Wednesday, August 10, 2011

Fused light Bulb decore tutorial


hi friends ,hows life ? Today i will share an easy projects that is totally about up-cycling junk :)

My interview with Of Pink and Fairy Tales


hi friends hows life well once again sorry for my absence but life is really getting busy at my end. Of Pink and Fairy Tales is a crafty blog with tons of great ideas and tutorials of many inspired projects a place worth of many visits ! Janelle from this crafty blog was so sweet to consider me and my blog for an interview and i happily accepted the honor ( I mean who wouldn't):) you wanna read more ? then click hear

Thursday, July 21, 2011

Some more free hand pot painting (in blue)


Hi friends hows life :) do you remember my last post on free hand pot painting ! today's post is a continuation of it. I will show you another free hand pot painting project that i was only fifteen at that time and was free after my exams oh 10th grade so i made this along with two smaller vases (which were hijacked by some family friends ):) so couldn't show you but this one! my mother has kept safe with her through all these years and she loves it .The vase is made of Plaster of Paris all i did was that i coated it with white poster paint as a base then drew a free hand net of flowers and leaves all over with pencil and then i painted them and when every thing was dry i gave it a slight spray of lacquer to secure the poster paints as they are water solvable so humid weather may damage its appearance gradually or if God forbid some body holds it with wet hands or sweated hands ! Oh my God that would be a disaster :) so the lacquer spray is a guard against all these mishaps .


A bit Close Up to show you the details ,while painting this beauty i filled the petals with ultramarine blue mixed with white and then pure in the darker areas .Lastly! outlined them with Navy blue ,this out lining part was the most difficult one as i did it with size 1 brush and you have to hold your breath to paint such delicate lines because breathing produce a light movement in your hold so your lines will also show up these slight tremors, plus its very time consuming too any how those were free days ,No responsibilities so i could work with full dedication but know after kids and taking care of the house it looks like a dream :)
You can notice the slight chip off look in some flowers this is the effect that 13 years has marked on it but it kind of look better this way :) sort of a slight vintage look !what do you think?


the upper and lower brims are also painted in navy blue ,a simple but elegant border.

Tuesday, July 19, 2011

Thursday, July 14, 2011

Instant bag organizer Tutorial

Hi friends today i will share one of my fresh inspired creation that is my favorite so far and the amount of convenience it provides me is so so so great.


A 24 pockets changeable HAND BAG organizer (12 pockets outside and 12 inside with a large opening in the middle)
once you have done all the stuffing just pick it up and place it in side your hand bag.
OK first thing is first i have to give the credit to whom i got this idea from

The Kangaroo keeper


I saw this advertisement in one of the blogs (planet Weidknecht) i am following and i was totally mad to see this and wanted it so bad and its not very expensive either but i live in pakistan and its a long procedure to buy online stuff here:( any how here's my version and i name it the
instant bag organizer :)
hope you like it and its not difficult at all

things you need
  • 1 yard fabric will be enough
  • scissors
  • sewing machine
  • heavy duty machine needles


OK now to make a large instant organizer cut the fabric according to the above image (you may change the size according to your needs)
  • 2 squares 15"x 15"
  • 4 rectangles of 12"x 15"
  • iron and fold all of these in half

iron and fold the long sides of the rectangles half an inch towards the wrong side
to create a false seem


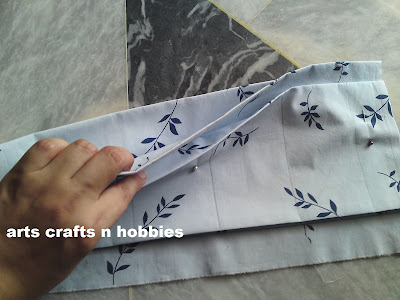
now sandwich the larger floded piece in between the 2 smaller folded rectagles in such a way that its about 2 inches higher then the base line and about 1 inch lower then the upper edge . Keep the open sides of the smaller rectangles at the lower side so that it will come at the base of the pockets .Pin and secuer this


now mark the lines of the pockets to be sewn i made 4 large pockets and two 1.5 inch narrow pockets at each end .Its all up to you you may decrease or increase the number of pockets you need ,just be care full that the pockets on the extermities should be narrow as they will come in the width of the bag use them for thin objects as pencils lipsticks, eye pencils, nail cutters e.t.c mark one side and the back side's pockets will be formed automatically ;)


now stitch along the marked lines and at the base of the smaller rectangle to seal the lower edge of the pockets .make the other side just the same way and sew them together from the sides and the base and leave the mouth open .


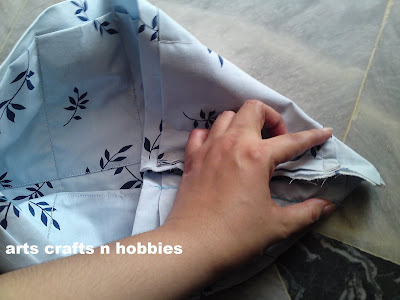
stuff your fingers in the corners and make a diagonal stitch between the fingers as shown above this is the distance that will cover the two narrow 1.5 inch pockets (total length covered 3 inches between the fingers)


sew and cut off the extra corner .

turn the inside out and you are all done ,good to stuff in !well what ever you want ,you name it and you will have a pocket for it :)

it took me only an hour to make this and i love it .ENJOY

linking to
Funky junk Interiors
making Monday marvelous
market yourself monday
motivate me monday
get your craft on linky party
The inspiration board linky party
{wow me} wednesday #8
world wide blog hop #3
share the love Wednesday linky party
linky party no#62 by tea rose home
whats up wednesdays link party_20

LinkWithin

Related Posts with Thumbnails