
A 24 pockets changeable HAND BAG organizer (12 pockets outside and 12 inside with a large opening in the middle)

once you have done all the stuffing just pick it up and place it in side your hand bag.
OK first thing is first i have to give the credit to whom i got this idea from
The Kangaroo keeper
I saw this advertisement in one of the blogs (planet Weidknecht) i am following and i was totally mad to see this and wanted it so bad and its not very expensive either but i live in pakistan and its a long procedure to buy online stuff here:( any how here's my version and i name it the
instant bag organizer :)
hope you like it and its not difficult at all
things you need
- 1 yard fabric will be enough
- scissors
- sewing machine
- heavy duty machine needles

OK now to make a large instant organizer cut the fabric according to the above image (you may change the size according to your needs)
- 2 squares 15"x 15"
- 4 rectangles of 12"x 15"
- iron and fold all of these in half

iron and fold the long sides of the rectangles half an inch towards the wrong side
to create a false seem

now sandwich the larger floded piece in between the 2 smaller folded rectagles in such a way that its about 2 inches higher then the base line and about 1 inch lower then the upper edge . Keep the open sides of the smaller rectangles at the lower side so that it will come at the base of the pockets .Pin and secuer this

now mark the lines of the pockets to be sewn i made 4 large pockets and two 1.5 inch narrow pockets at each end .Its all up to you you may decrease or increase the number of pockets you need ,just be care full that the pockets on the extermities should be narrow as they will come in the width of the bag use them for thin objects as pencils lipsticks, eye pencils, nail cutters e.t.c mark one side and the back side's pockets will be formed automatically ;)

now stitch along the marked lines and at the base of the smaller rectangle to seal the lower edge of the pockets .make the other side just the same way and sew them together from the sides and the base and leave the mouth open .
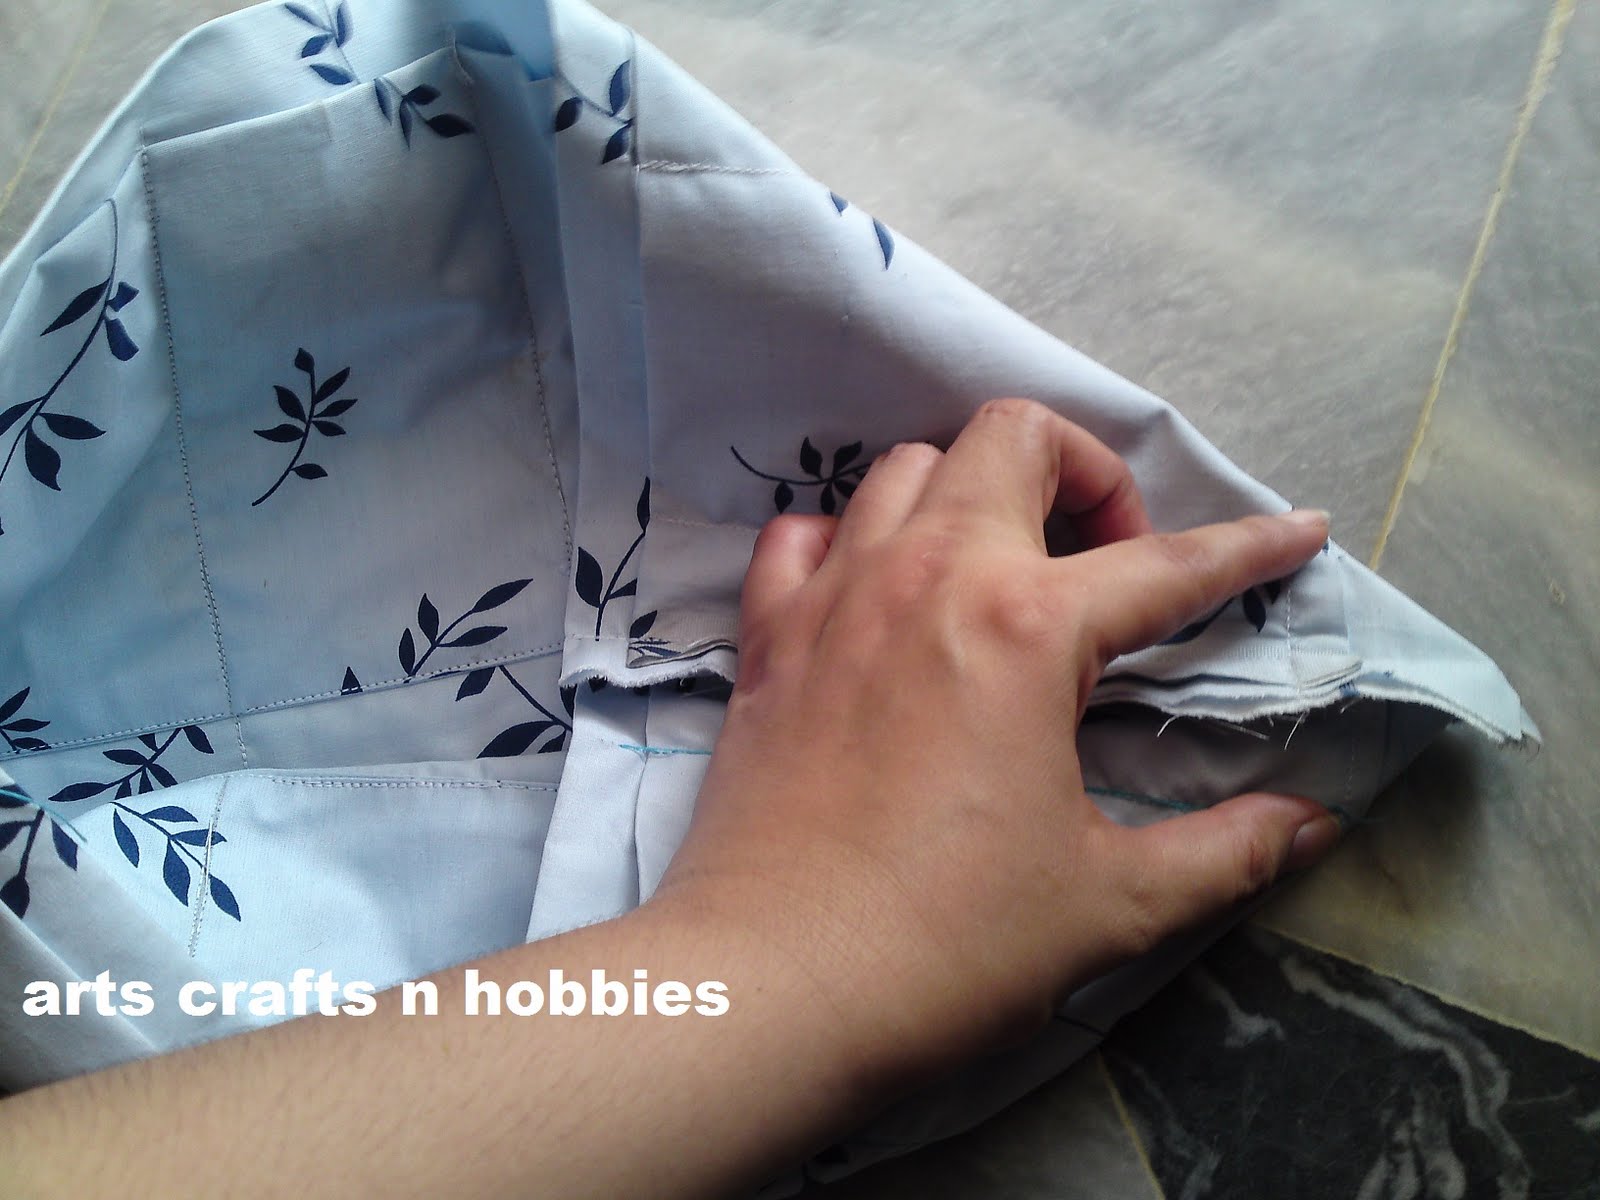
stuff your fingers in the corners and make a diagonal stitch between the fingers as shown above this is the distance that will cover the two narrow 1.5 inch pockets (total length covered 3 inches between the fingers)
 sew and cut off the extra corner .
turn the inside out and you are all done ,good to stuff in !well what ever you want ,you name it and you will have a pocket for it :)
it took me only an hour to make this and i love it .ENJOY
linking to
Funky junk Interiors
making Monday marvelous
market yourself monday
motivate me monday
get your craft on linky party
The inspiration board linky party
{wow me} wednesday #8
world wide blog hop #3
share the love Wednesday linky party
linky party no#62 by tea rose home
whats up wednesdays link party_20
That is so lovely, can see so many uses for that, love it!!!
ReplyDeletelotsa luv
i am so happy that you like it Theresa :)
ReplyDeleteI think it will be very lovely to take but not easy to make.Hehe~
ReplyDeletechinese symbols
hmmm..very useful, i am not interested in sewing stuff but i think i have to make this for my scattered stuff..
ReplyDeletethanks for the tutorial my dear aapi :)
i made one for my sister some good 3+ years back, but the thing is she forgets to change her organizer onto the new bag which is she is changing to, so she stopped using it?!
ReplyDeletethank you very much 1204233361 ,creative mind and creative mama for the lovely comments :) well its not difficult at all to make you just need a bit of interest in sewing :)which luckily i have .and yes its lovely to take as a present :) .and creative mama I think you should remind your sis about the great gift you once made for her :) .
ReplyDeleteI've seen those Kangaroo Keepers in person (a friend has one), so I can tell you that you did a great job making your own custom version! :)
ReplyDeleteYour blog is amazing.
ReplyDeleteKindly drop by my blog and accept an award
Cheers from Bangalore ,India
Dr Sonia S V
http://cardsandschoolprojects.blogspot.com
thank you so much Sophia for the appreciation and Dr.Sonia i am really thankful for the honor of the award .
ReplyDeleteWell,I think I may try to do it by myself this weekend!Why not?
ReplyDeleteKaren Millen dresses
Wow! What a great idea. :) Following from Sumo‘s Sweet Stuff link party. Would love to have you link this up to my {wow me} wednesday link party going on right now over on my blog. Hope to see you there.
ReplyDeleteGinger
gingersnapcrafts.blogspot.com
thank you Gabrielle for liking and appreciating my effort and Ginger big thanks for following my blog and liking it i just linked up in your Link party thanks for the invite dear ,bless ya
ReplyDeleteI love this idea! Thanks so much for sharing it!
ReplyDeleteI liked it so much I just shared it on my facebook page too!!
Thanks for linking to the Creating Success Worldwide blog hop!! Hope you'll come back again next week!
Jill @ Creating my way to Success
http://www.jembellish.blogspot.com/
Great job! I'm your newest follower and I'd love if you would join us over at Sew Woodsy and link up this project!
ReplyDeletethank you Jill for the love :)
ReplyDeleteand Katie just added your linky party to my link list :)to follow every week..take care
Great idea! I could really use this!
ReplyDeleteFun project! AWESOME! Wish I could sew...can I glue this together...hehehe! Popping by from the International Blog Hop! Pop Art Minis
ReplyDeletethank you Jaime and Joni :) for the sweet comments
ReplyDeleteGreat tutorial. I have been meaning to make one of these for a while now. I would love for you to stop by http://diyhshp.blogspot.com/ on Monday to link up your bag organizer and any other projects you would like to share.
ReplyDeleteI desperately need to make one of these. Thank you for linking up last week at Sew Woodsy! Please come back tomorrow and link up your most recent project!
ReplyDeleteGreat tutorial. What a great idea for hopping from purse to purse! Thanks for linking to the party at Share the Love Wednesday!
ReplyDeleteMary
Just completed this project last night- i love love love it! thanks for the awesome tutorial :D
ReplyDeletehi Anonymous i wold love it if you mail me a picture of your hand bag organizer and i would feature it :) what do you think:)
ReplyDeleteAlthough I am not very good at sewing, I always wanted to make a bag, any bag. Your tutorial is great. Look very simple and easy. I am hoping to make one soon.
ReplyDeleteI've been planning to buy a bag organizer when I saw this post, I think making one is way better than buying since I'd enjoy the making process. Thank you so much for the tutorial!
ReplyDeleteAnnabella Merlin
Creative Photo Albums
Thanks Iram for such a lovely blog. your tutorial is great. going to make one for myself real soon.
ReplyDeletedeepa from India
Hi Iram,
ReplyDeleteThank so much for these great tutorial. I just need organize my bag and I'll try to make one with you precious help.
Have a look at my blog and leave a comment I’ll be glad.
Hugs from Portugal
Ana Love Craft
www.lovecraft2012.blogspot.com
i tried to make it. but got stuck at one point. wont the raw edges be seen inside when u flip it inside out in the last step?
ReplyDeletehow do you sew through so many layers of fabric..my needle broke..:(
ReplyDeleteand I ddid not get how you made the base.. im right till the two smaller rectangles are sandwitched between the larger rectangle. did not get the next step.repeated the same for other side. how to join both pieces?
ReplyDeletehi sorry for late reply ...i used heavy duty needles they will easily go through 6 or 7 layers of cotton and yes the raw edges are visible in the in side but cotton does not Frey so no problems with that . sand which the larger triangle and make the pockets look closely in the seventh picture the smaller rectangles are placed in the middle of the larger rectangle the upper and lower part is not sandwiched ...once u make the pockets for both the sides then simply join them by stitching the three sides and the put ur fingers in the corners and stitch the triangle created look at the next pictures
Deletet took me only an hour to make this and i love it
ReplyDeletereally nice...
This is such nice and useful information
Thanks for sharing this article; it’s been a really great interesting read.
Free online portal for classified advertisements, sell & buy online
"Nicely presented information in this post, I prefer to read this kind of stuff."
ReplyDeleteby ORGANIZER
Great tutorial. I am putting some thin batting inside each piece to give it a little more body.
ReplyDeleteHeureuse d'avoir trouvé le modèle pour faire un organisateur de sac cela fait un bon moment que je consulte les sites pour trouver comment la fabriquer, je vais me mettre à l'ouvrage
ReplyDeleteMerci beaucoup de pouvoir me permettre de le créer pour mon usage car pas facile de retrouver quelque chose dans mon sac
Planning to make one today! But I really prefer all my seams finished, so, I think, I'll try some bias tape for that porpouse!
ReplyDelete