An interesting blog with lots of creativity.From arts n crafts ,recipes ,pet care ,home projects to Fun ideas this blog has a little bit of some thing for every one so come along and have a great time ..........
Thursday, July 21, 2011
Some more free hand pot painting (in blue)
Hi friends hows life :) do you remember my last post on free hand pot painting ! today's post is a continuation of it. I will show you another free hand pot painting project that i was only fifteen at that time and was free after my exams oh 10th grade so i made this along with two smaller vases (which were hijacked by some family friends ):) so couldn't show you but this one! my mother has kept safe with her through all these years and she loves it .The vase is made of Plaster of Paris all i did was that i coated it with white poster paint as a base then drew a free hand net of flowers and leaves all over with pencil and then i painted them and when every thing was dry i gave it a slight spray of lacquer to secure the poster paints as they are water solvable so humid weather may damage its appearance gradually or if God forbid some body holds it with wet hands or sweated hands ! Oh my God that would be a disaster :) so the lacquer spray is a guard against all these mishaps .
A bit Close Up to show you the details ,while painting this beauty i filled the petals with ultramarine blue mixed with white and then pure in the darker areas .Lastly! outlined them with Navy blue ,this out lining part was the most difficult one as i did it with size 1 brush and you have to hold your breath to paint such delicate lines because breathing produce a light movement in your hold so your lines will also show up these slight tremors, plus its very time consuming too any how those were free days ,No responsibilities so i could work with full dedication but know after kids and taking care of the house it looks like a dream :)
You can notice the slight chip off look in some flowers this is the effect that 13 years has marked on it but it kind of look better this way :) sort of a slight vintage look !what do you think?
the upper and lower brims are also painted in navy blue ,a simple but elegant border.
Tuesday, July 19, 2011
"A Thing Of Beauty award" for my blog
I am feeling so lucky today to let you all know that Dr.Sonia of cards,Crafts and kids Projects have nominated me for this sweet award
Thursday, July 14, 2011
Instant bag organizer Tutorial
Hi friends today i will share one of my fresh inspired creation that is my favorite so far and the amount of convenience it provides me is so so so great.
A 24 pockets changeable HAND BAG organizer (12 pockets outside and 12 inside with a large opening in the middle)
once you have done all the stuffing just pick it up and place it in side your hand bag.
OK first thing is first i have to give the credit to whom i got this idea from
The Kangaroo keeper
I saw this advertisement in one of the blogs (planet Weidknecht) i am following and i was totally mad to see this and wanted it so bad and its not very expensive either but i live in pakistan and its a long procedure to buy online stuff here:( any how here's my version and i name it the
instant bag organizer :)
hope you like it and its not difficult at all
things you need
OK now to make a large instant organizer cut the fabric according to the above image (you may change the size according to your needs)
iron and fold the long sides of the rectangles half an inch towards the wrong side
to create a false seem
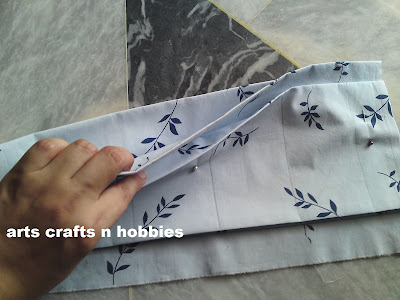
now sandwich the larger floded piece in between the 2 smaller folded rectagles in such a way that its about 2 inches higher then the base line and about 1 inch lower then the upper edge . Keep the open sides of the smaller rectangles at the lower side so that it will come at the base of the pockets .Pin and secuer this
now mark the lines of the pockets to be sewn i made 4 large pockets and two 1.5 inch narrow pockets at each end .Its all up to you you may decrease or increase the number of pockets you need ,just be care full that the pockets on the extermities should be narrow as they will come in the width of the bag use them for thin objects as pencils lipsticks, eye pencils, nail cutters e.t.c mark one side and the back side's pockets will be formed automatically ;)
now stitch along the marked lines and at the base of the smaller rectangle to seal the lower edge of the pockets .make the other side just the same way and sew them together from the sides and the base and leave the mouth open .
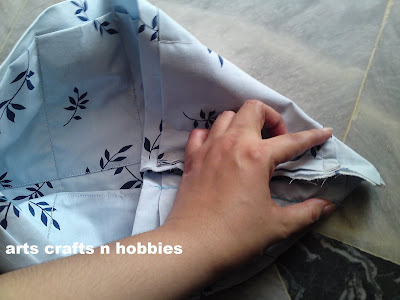
stuff your fingers in the corners and make a diagonal stitch between the fingers as shown above this is the distance that will cover the two narrow 1.5 inch pockets (total length covered 3 inches between the fingers)
sew and cut off the extra corner .
turn the inside out and you are all done ,good to stuff in !well what ever you want ,you name it and you will have a pocket for it :)
it took me only an hour to make this and i love it .ENJOY
linking to
Funky junk Interiors
making Monday marvelous
market yourself monday
motivate me monday
get your craft on linky party
The inspiration board linky party
{wow me} wednesday #8
world wide blog hop #3
share the love Wednesday linky party
linky party no#62 by tea rose home
whats up wednesdays link party_20
A 24 pockets changeable HAND BAG organizer (12 pockets outside and 12 inside with a large opening in the middle)
once you have done all the stuffing just pick it up and place it in side your hand bag.
OK first thing is first i have to give the credit to whom i got this idea from
The Kangaroo keeper
I saw this advertisement in one of the blogs (planet Weidknecht) i am following and i was totally mad to see this and wanted it so bad and its not very expensive either but i live in pakistan and its a long procedure to buy online stuff here:( any how here's my version and i name it the
instant bag organizer :)
hope you like it and its not difficult at all
things you need
- 1 yard fabric will be enough
- scissors
- sewing machine
- heavy duty machine needles
OK now to make a large instant organizer cut the fabric according to the above image (you may change the size according to your needs)
- 2 squares 15"x 15"
- 4 rectangles of 12"x 15"
- iron and fold all of these in half
iron and fold the long sides of the rectangles half an inch towards the wrong side
to create a false seem
now sandwich the larger floded piece in between the 2 smaller folded rectagles in such a way that its about 2 inches higher then the base line and about 1 inch lower then the upper edge . Keep the open sides of the smaller rectangles at the lower side so that it will come at the base of the pockets .Pin and secuer this
now mark the lines of the pockets to be sewn i made 4 large pockets and two 1.5 inch narrow pockets at each end .Its all up to you you may decrease or increase the number of pockets you need ,just be care full that the pockets on the extermities should be narrow as they will come in the width of the bag use them for thin objects as pencils lipsticks, eye pencils, nail cutters e.t.c mark one side and the back side's pockets will be formed automatically ;)
now stitch along the marked lines and at the base of the smaller rectangle to seal the lower edge of the pockets .make the other side just the same way and sew them together from the sides and the base and leave the mouth open .
stuff your fingers in the corners and make a diagonal stitch between the fingers as shown above this is the distance that will cover the two narrow 1.5 inch pockets (total length covered 3 inches between the fingers)
sew and cut off the extra corner .
turn the inside out and you are all done ,good to stuff in !well what ever you want ,you name it and you will have a pocket for it :)
it took me only an hour to make this and i love it .ENJOY
linking to
Funky junk Interiors
making Monday marvelous
market yourself monday
motivate me monday
get your craft on linky party
The inspiration board linky party
{wow me} wednesday #8
world wide blog hop #3
share the love Wednesday linky party
linky party no#62 by tea rose home
whats up wednesdays link party_20
Saturday, July 9, 2011
Arts crafts n hobbies is now on Face Book
Friday, July 8, 2011
"Me" featured at Craftionary
hi friends today i have the honor of being the guest blogger at a very cute blog Craftionary owned by Hani a very organized and sweet lady .
please do check out :)
Wednesday, July 6, 2011
Chinese character in stain glass
Hi friends hows life ! today i wana share a stain glass painting with you all that i made some 8 years ago this is the first painting i have ever tried in glass painting and also the first painting i did after my marriage, my awsome mother inlaw was alive back then and she liked it alot ,mind you friends she was a great crafter her self excelent in stiching and knitting and really good in oil painting and wood crafting some day i will show you her creations ,a really nice person but its so sad that you loose great people like her so soon she died just after 1 and half year of my marriage! one of the reasons this painting is really dear to me is that it has so many memories related to her .
I saw this character on a miniature wooden decoration screen that belonged to my mother in law. I drew and enlarged the image free hand on a paper and then transferred it on the glass .
I have used crystalline blue and purple color in the dress where as milky white in her skirt,handkerchief and in her face.The painting is outlined with golden lead,in the beginning i wanted to frame this painting but hubby suggested that it would look much better unframed if you place it on a wooden holder and frankly now i am quite happy with the result and i just love the way it creates a shadow on the wall behind it :) .Oh totally forgot to tell you that the wooden holder its placed on is hand crafted by my mother in law :) amazing isn't it ! yup she sure was a talented lady and this painting has so many memories related to her may her soul is blessed in heaven Amin .
LINKING TO
strut your stuff
show of your stuff party
freaky Friday follow
Subscribe to:
Posts (Atom)