Tuesday, June 28, 2011

Faux Fish globe


Hi friend today i want to show you my brand new" fish home".

Well what do you think about it :) a fish container that does not need to be cleaned on a regular basis and a fish that needs no feeding ,no care, can be left out for a long period of time and would never become sick or will die because of the bad care ....Hummm like the idea :) ?


OK enough beating about the bush lets come to business and tell you how its made ,well guys this is the great idea of Jane lake and i found it one day just by chance when i was randomly browsing the net i loved the idea soooo much that i just got to make this one i bought all the materials needed from a craft store but unfortunately couldn't find a small round fish bowl so i bought this large glass as my fish container.
Things you will need to make this project
  • water crystals (transparent balls)
  • plastic fish
  • coral or sea shells
  • A container
for the detailed instructions and tutorial click here


my sweet little jelly gold fish ,yup its not made up of plastic its made with the same water absorbing jelly like material from which water crystals are made ,now they are easily available in a large variety of colors and shapes originally they are quite tiny but when soaked in water they swell up almost double their original size.
You can actually see the round water crystals at the top near the brim of the glass !actually the catch behind this is that these transparent crystals disappear when submerged in water so the fish placed in them seems to be swimming in the water .


Linking to
nap time crafters friday favs party

linky party no.59

Wednesday, June 15, 2011

Excellent play dough recipe


Hi friends summer is" ON "and summer vacations have also started so every mother knows that the only refuge for her left is to keep the children busy in some nondestructive positive activity ,playing with play dough is one of them :) but the play doughs available in market are not only quite expensive here in Pakistan but the thing that bothers me most is that we don't know what its made from and what type of toxic colors are used in it and we happily spend our own hard earned money on buying this poison for our kids and let them play with it ,for the very reason i decided to experiment and make my own home made play dough with 100% non toxic ingredients and yesterday i finally succeeded in making an excellent play dough with the ingredients that are all ready present in every kitchen .
R U ready for my very own cheep play dough recipe :)

INGREDIENTS;
  • 1cup fine all purpose flour (with out self raising agent)
  • half cup fine rock salt
  • 1table spoon vegetable oil
  • 1 cup synthetic white vinegar
PROCEDURE;
  1. Thoroughly mix all the dry ingredients with your hands by rubbing them in your palms thus breaking any lumps (if present).
  2. In a cooking pan add the oil and vinegar to the dry mixture and mix well with a whisk.
  3. On low heat cook for 1 or 2 minutes and continuously stir until the dough is no more sticky to the sides of the pan and starts gathering in the center of the pan this is the sign that its ready, remove from heat and take it out of the pan.
  4. Let it cool down a bit when easy to handle(but still warm) kneed it on a clean hard surface .
  5. Add food colors of your choice.
  6. If the stinky smell of vinegar is bothering you just add 2 drops of vanilla essence! but i will recommend you not to add the essence as the bad smell of vinegar will reduce the urge in your children to eat and taste the dough :)
  7. Place in a air tight jar and if ever you feel that its getting dry with time or while playing under a ceiling fan then simply add a few drops of water to it and slightly kneed it and store back in the airtight container ,it will be good as new.

some miniature dough fruits my daughter present me as a gift for my effort :)

Tuesday, June 7, 2011

Pillow case dress Refashion tutorial


Hi friends how are you all ,today i will show you how to reshape a simple pillow case dress into a cute ruffly frock


Well the story starts from the day when i made a long pillow case dress for my elder daughter but she some how didnt like it a bit and totaly refused to wear it :(
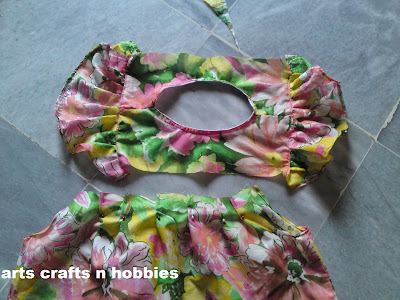
so i asked her that can this be given to her younger sis and she gladly agreed now the dress was pretty long for the younger one so i decided to do some thing interesting with it thats how i cut it


remember that its a prepared dress with a back so i am showing you the cutting from the front and we aill automatically get the back parts


the shourlder ruffles pieces are trimmed to have a scalloped shape


The neck line is prepared by using a bias tape and shulder ruffels are attached to the body and the lower skirt is pleated and attached to the prepared body .


thats it all done now i just added a big ribbon bow in the center of the body


mommy makes me soooooo mad with her camera at me :)


Now thats better mood :)


the back


fun with sis and cousins :)


BUT! the story does not end hear now my elder dauter is also in love with the transformed look of previously" her" pillow case dress and wants it back :( but now its too short for her .......(KIDS) .......... ! any how the fight got resolved on my promise to her that i will make a dress just like this for her in her choice of fabric and every one is happy :)


LINKING TO
fireflies and jelly beans
strut your stuff linky party
the shabby chick cottage

LinkWithin

Related Posts with Thumbnails