Sunday, October 2, 2011

10 minutes flat Sandle's Revamp


Good day friends ,hows life , i am so angry on my self for not being able to be a good and regular blogger ,may be my Gall bladder(removed by surgery)has taken away my punctuality with it :) but the good news is that the creativity inside me is still very much alive so we have HOPE! :)
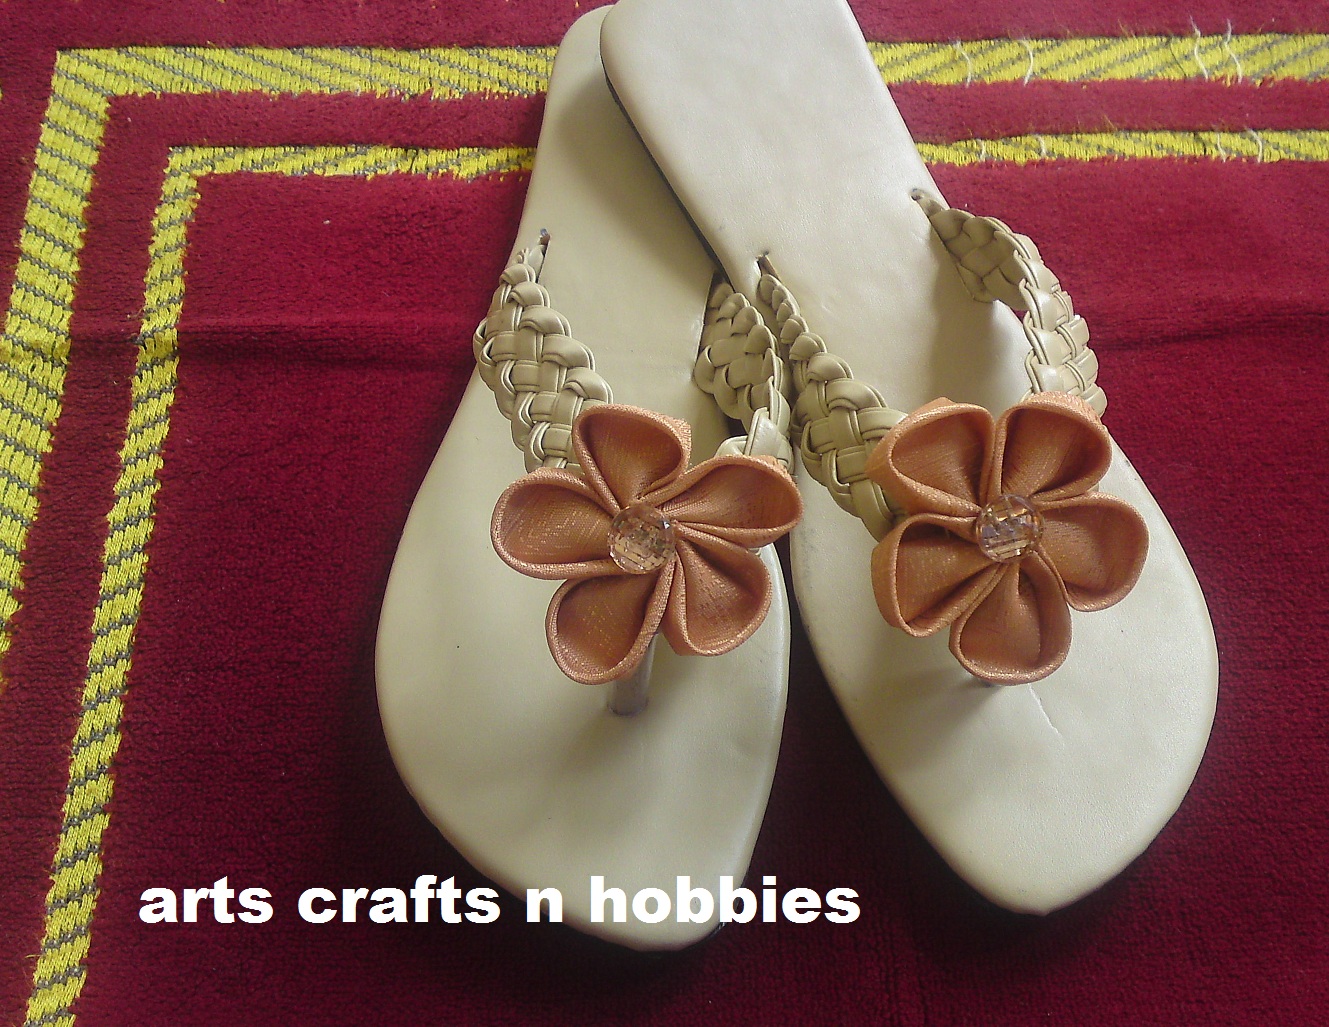
ok enough beating about the bush lets get back to business a few days back i was enjoying the shopping trip with my elder sis and found some really cool woven flat sandals and they were at a quite reasonable price with lots of potential in them .


So with out secont thought i brought them home and decided to embellish them with simple Kanzashi flowers which i once learned from a Korean friend of mine Miss .Enjang Park .I still miss her at times such a sweet girl :).


I selected this slightly stiff peach color silk fabric and created the two beauties ,its slightly difficult to work with silk in flower making but its worth the shiny look ,for the center i used these fancy peach color buttons which i already had since a long time waiting in my craft box to beautify some thing and yesterday was their big day.


the straps are wide enough so they gave me sufficient area to settle the flowers on them in center with the help of hot glue ,and TADAAAAAA all done some really trendy looking flats are waiting to be worn :) hope you like this simple revamp .

Friday, September 16, 2011

Back to my blog after the surgery :)

Hello dear readers! i know, i know, some of you must be angry on my long absence and some would have forgoten about "arts crafts n Hobbies",but still i am thank full to all of you that you stayed and waited with patience so for the friends like you all deserve some explanation and may be a glimpse to what happened ok lets start i have never mentioned these things on my blog before as its a craft related blog so i always considered the matters related to my SELF as un relevent ,any how guys i had gall stones (stones in my Gall blader) quite some time ago well 4 years to be more exact but they got diagnosed a few months back ,the impared functioning of my gall bladder was causing reapeated ulcers in my stomac also known as (Peptic ulcers)which are very pain full and now when the stones were discoverd in an ultasound i was suggected to surgically remove my gallbladder which was causing my repeated episodes of extreme pain ,so friends here's the news guys i have had my surgery and i am back almost recovered last few days were quite pain full but now things are getting back to normal :) so no more absence from my blog now :) ,this post was just to thank you all to bear the absence with me .

Thursday, August 18, 2011

YOYO Embellished Head band tute


My kids have recently started using head bands instead of pony tails so i made some cute head bands for them i will share them one by one with you all.
Today i will share the maroon and white one which i made to go with a cute dress that my little one has .


the things you will need
  • 1 large YOYO in maroon velvet
  • 1 smaller yoyo in white silk
  • two scrappy strips of white net
  • a vintage button
  • needle and thread
  • transparent glue or glue gun
  • black plastic head band

How to make a yoyo tutorial (in case you dont know how to make one already click on this link)


its pretty simple just stitch the white yoyo on top of the velvet one


add the button in the middle


sew running stitch along one side of the net strips ,pull and secure thread before breaking it off.


stitch the two net fan like shapes at the back of the maroon yoyo and stick this whole thing with the head band thats it friends all done :) hope you like it .a perfect match for the dress ! see how happy she is MahsaAllah:)


linking to
Sunday scoop link to party
Sunday showcase party w/clean mama

Sunday linky party no.29

Monday, August 15, 2011

Flower arrangement on a dry root


Hi friends hows life i am back again to share an other simple arrangement i have made on the dry root ,Yup its the one i was talking about yesterday so hear is a glance of it as i promised .

Its a pretty simple arrangement and hardly took 10 minutes to finish ,i kept it simple as the root it self has a very interesting shape so did not want the flowers to act as a distraction .
All I did was that i hot glued the flowers in place and then added some white beads hear and there to add some further life to the dull root .As i mentioned yesterday i found this root in a dam covered with mud i brought it home scrubbed it clean sun dried it and gave it two coats of varnish to preserve it ,and by the way this root is with me from the last 12 years i found it before my marriage ,and since then i have decorated it in different styles but sadly never took any pictures back then :( {i never knew i will start blogging one day :) } .That's it for today my friends wish you a very happy,healthy and blessed day .

Sunday, August 14, 2011

Fish glob dry arrangement


Good day friends how r u all :).Well as you all know its the month of Ramadan and Iftar Parties are on,and yesterday we had one at my place so while cooking and preparing for the
Iftar i was also decorating our sitting area which have a beautiful triangular fire place .There used to be a fish glob settled there with real gold fish in it once! and they use to look so pretty there adding life to room but sadly they died and after words we bought many more goldfishes but some how none of them survived in the glob so we had to let go of the idea :( but yesterday suddenly this new decorative idea popped into my mind that why dont i arrange a bunch of artificial flowersinside it, so after some trials i was finally happy with the
presented look :) how do you find it ?

all i did is that i bend the stem of the bunch and taped it with the marble surface and inverted the fish glob over it .To insert the bunch inside the globe i softly hold the flowers and leaves close to each other so that they can pass through the tiny opening of the glob without damaging the shape of the bunch.That was the main part and then to add some more interesting look to the arrangement i added some cones and a dried root to it


i found these cones (and these are not pine cones) in NathiaGali a beautiful hilly station near Maree and frankly i still dont know the name of the tree they are from :)


and this snake like root along with another one was found in a dam in my city they were full of mud but i loved the look of it so brought them home washed and painted some wood varnish over them .In my next post i will show you another easy arrangement that i made with the other root .So stay tuned


You may also use some thing else to decorate the surroundings as for example some lacquer sprayed pebbles of different sizes or may be glass pebbles or some corals and sea shells it totally depends on you and the colors scheme of your room ........ have fun :)

linking to

making the world cuter monday

Thursday, August 11, 2011

The Wash Basin Tap Revamp


Hello dear friends how r u all ,today's post is a simple idea to improve the look of old wash basin Tap Valves .No! No.....you dont have to be a plumber for that, neither you need heavy tools like giant sized ranches ,screw drivers etc ,all you need is a some news paper and some spray paint thats it .
Wana know how to do this ?


OK hears the embarrassing "before picture" of our wash basin Tap some how the moisture and dust have entered in between the two layers of the valves giving it a very ugly and dirty look and the interesting thing is that it can not be disassembled or opened so that we can clean it out :( now the only solution left is to change the tap valves but unfortunately its an old design and spare parts are not available for this one so we either had to change the tap it self or just keep it as it is but i was not happy either way so thats what i did.


I tore long strips of news paper dipped them in water and then warped the tap stem and covered the area of wall and basin around the tap .The reason i dipped the news paper in water was that it makes the wrapping really easy and manageable, that not all wet news paper would temporarily stick to what ever surface it comes in contact with so it was really easy to cover the back wall and parts of basin.

Dry the valves with tissue paper and spray paint them with the coordinating color with your sanitary,let dry for half an hour and give it an other coat of spray paint and again leave to dry . Remove the news paper,if some paint accidentally leaked through the news paper ,no worries ! it can be very easily rubbed clean with paint Thinner.

there my new clean tap valves :) hope you liked them too!

Wednesday, August 10, 2011

Fused light Bulb decore tutorial


hi friends ,hows life ? Today i will share an easy projects that is totally about up-cycling junk :)

My interview with Of Pink and Fairy Tales


hi friends hows life well once again sorry for my absence but life is really getting busy at my end. Of Pink and Fairy Tales is a crafty blog with tons of great ideas and tutorials of many inspired projects a place worth of many visits ! Janelle from this crafty blog was so sweet to consider me and my blog for an interview and i happily accepted the honor ( I mean who wouldn't):) you wanna read more ? then click hear

LinkWithin

Related Posts with Thumbnails